Overview
Before you start sending data into your Mixpanel project, it's important to take some time to setup your Mixpanel instance and plan out what actions or behaviours you want to track, in order to achieve your product or business goals.
- Setup (for Organization Owners and Admins) - takes you through how you should go about setting up your Mixpanel Organization and the underlying Projects.
- Framework - if you need guidance on defining your metrics and KPIs to help you achieve your business and product objectives, this tutorial should help you.
- Tracking Strategy - this tutorial helps you understand Mixpanel's data model so you're equipped with building out your tracking plan to measure your metrics and KPIs.
Setting Up Mixpanel
Note: this section is for Organization Owners and Organization Admins who are responsible for setting up your Organisation and Projects.
You should have a Mixpanel Organization already assigned to your login if you had signed up as the main Mixpanel Owner. If not, please contact our Mixpanel Support team for assistance.
Here's an outline of what we'll be covering in this section:
- Configuring your Mixpanel Organization's Discoverability (Enterprise Plan non-SSO accounts only)
- Creating separate Development and Production Mixpanel Projects
- Planning your users' Data Access and Visibility using Mixpanel's Data Views & Classfication (Enterprise Plan Only)
- Seting up Teams structure and/or Adding Users to Mixpanel Projects
Organization Discoverability
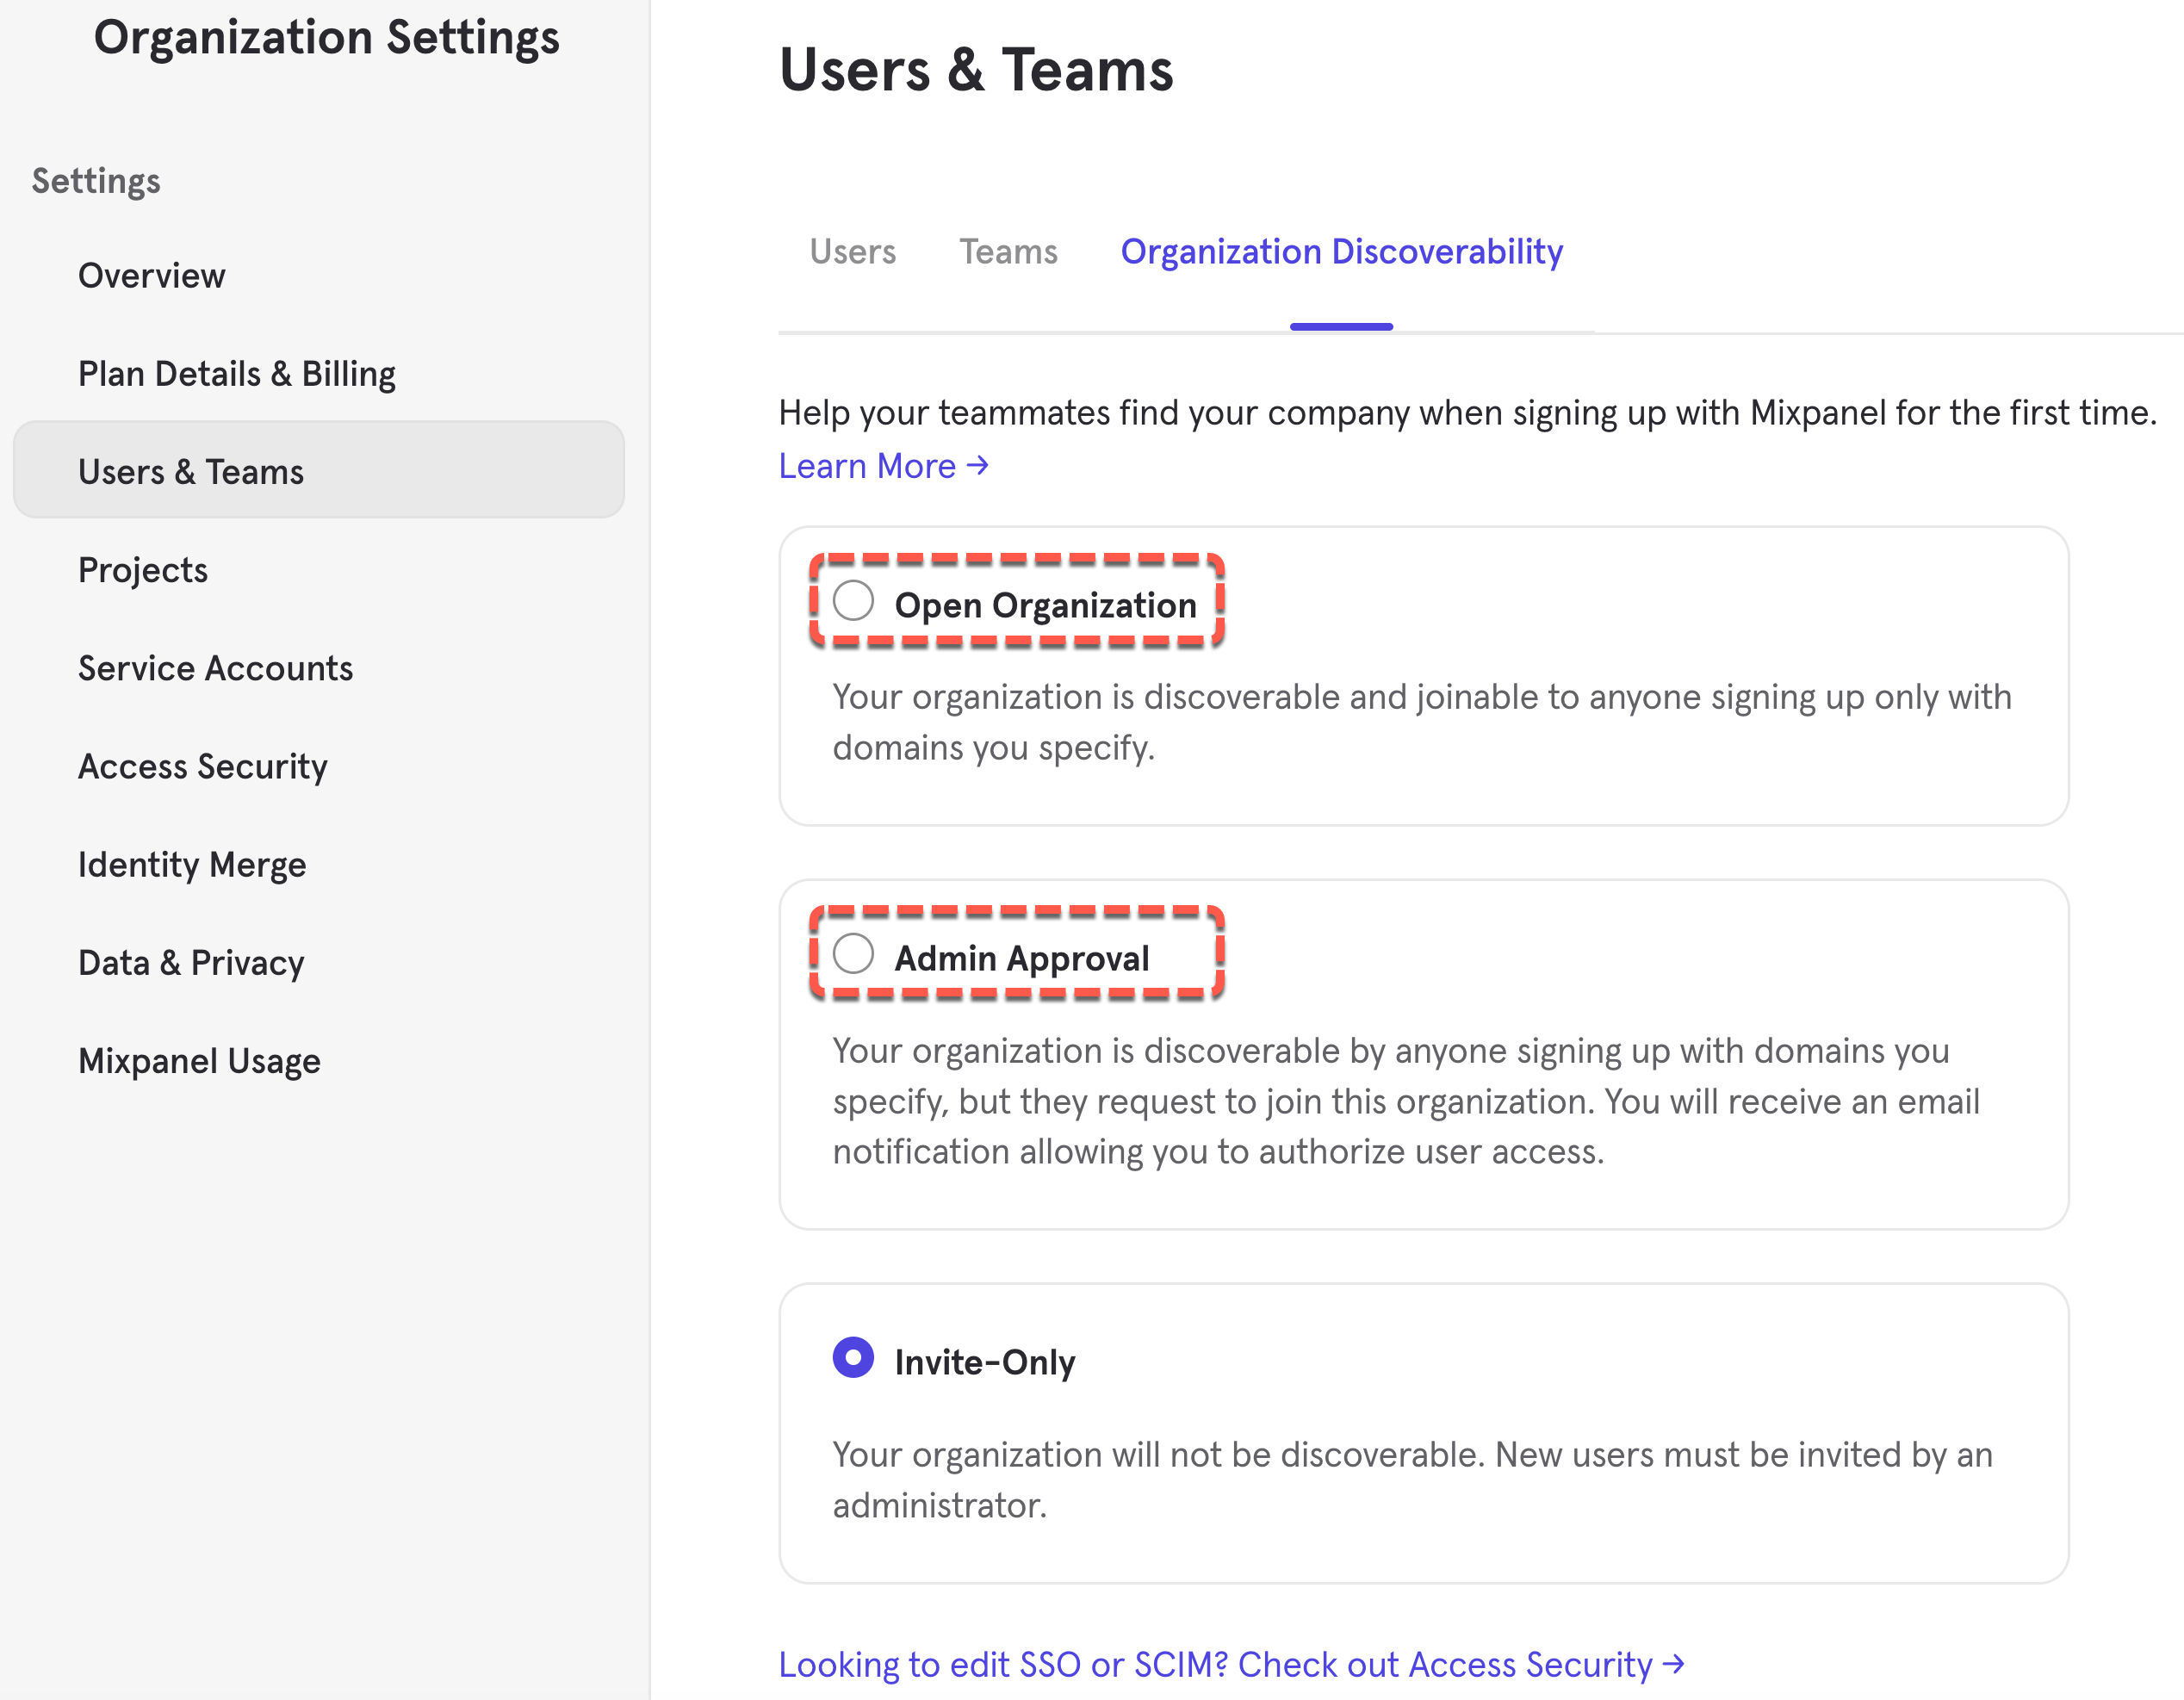
By default, an organization is setup as Invite Only, which means new users must be explicitly invited by an owner or admin to be part of the organization. If you are on an Enterprise Plan (opens in a new tab) and do not plan to setup SSO, Mixpanel recommends setting one of the following organization discoverability, by specifying the email domain(s) that should be granted access when a new user signs up for Mixpanel:
- Open Organization - any new user with maching email domain(s) can join (without approval)
- Admin Approval - admins will receieve an email notification (and approve) for users who made a request to join
Click here (opens in a new tab) to setup your organization, or for more information, refer to our documentation on Organization Discoverability.
Simplified Identity Management
Since April 2024, Mixpanel has made the Simplified API as the default identity management setting for newly created organizations. If your Mixpanel organization was created prior to this, it might not have this enabled.
Click here (opens in a new tab) to check and configure your organization to default to Simplified API. Also make sure that any new Mixpanel projects, that does not have data tracked yet, choose to use Simplied API.
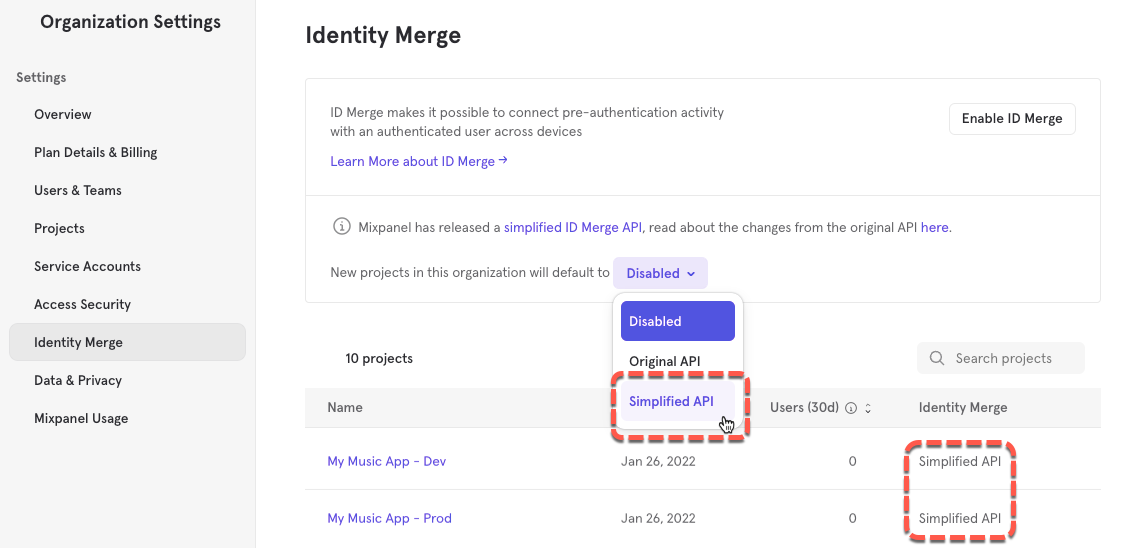
We recommend using the Simplied API option as it is a straightforward simpler way of managing your users' identity in Mixpanel. More details about how Simplified API handles identity management can be found in our documentation under Identifying Users. We will also cover a tutorial around this under the Identity Management Best Practice section.
Development and Production Project Setup
We recommend that you minimally setup two Mixpanel projects, one for Development data and another for Production data. This is to ensure that you keep development test data separate from actual live user behavioural data. Read more details about Developer Environments.
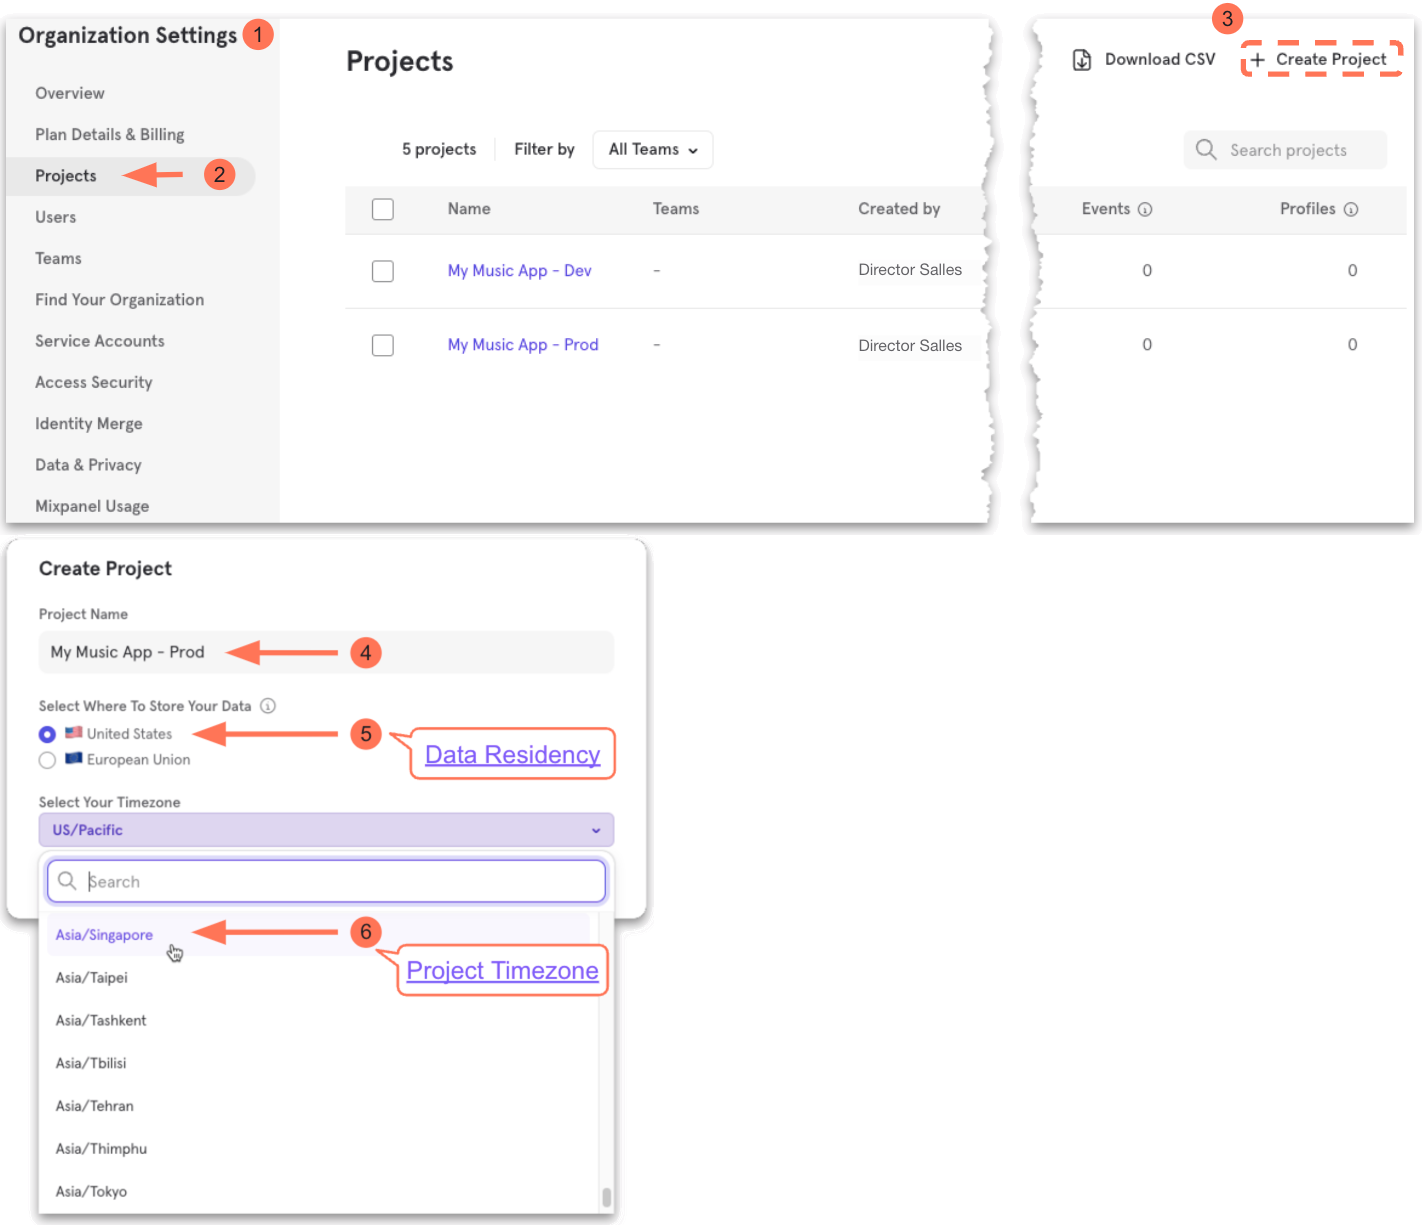
- Go to the Projects under your Organization Settings, click here (opens in a new tab)
- Click Create Project to create each project
- We recommend choosing United States as Where To Store Your Data (unless you have EU Residency requirements)
- Select the Timezone with which you want to analyze your data (more information on Project Timezones)
Refer to docs on Project Setup for more detailed steps and best practices.
Plan Data Access and Visibility
By default, all data in a Mixpanel project is accessible to all your users in the Mixpanel organization. However, you may have requirements to segregate data visibility or restrict access to certain data that might be considered more sensitive and should not viewable by the entire organization. In these instances, you might be able to use Data Views and Classified Data within your Mixpanel project to restrict access.
Note: Data Views and Classfied Data settings are at project level. You would need to have data in your Mixpanel project to be able to configure these settings.
Data Views
If for instance, you want to provide the web team only with access to web events, and the iOS and Android teams access to their specific events, but still want the business teams to have a single customer view of the customer's behaviour across the different platforms. Data Views can help with this. It enables Project Owners and Admins to manage data access for a group of users within a single Mixpanel project for privacy and productivity purposes.
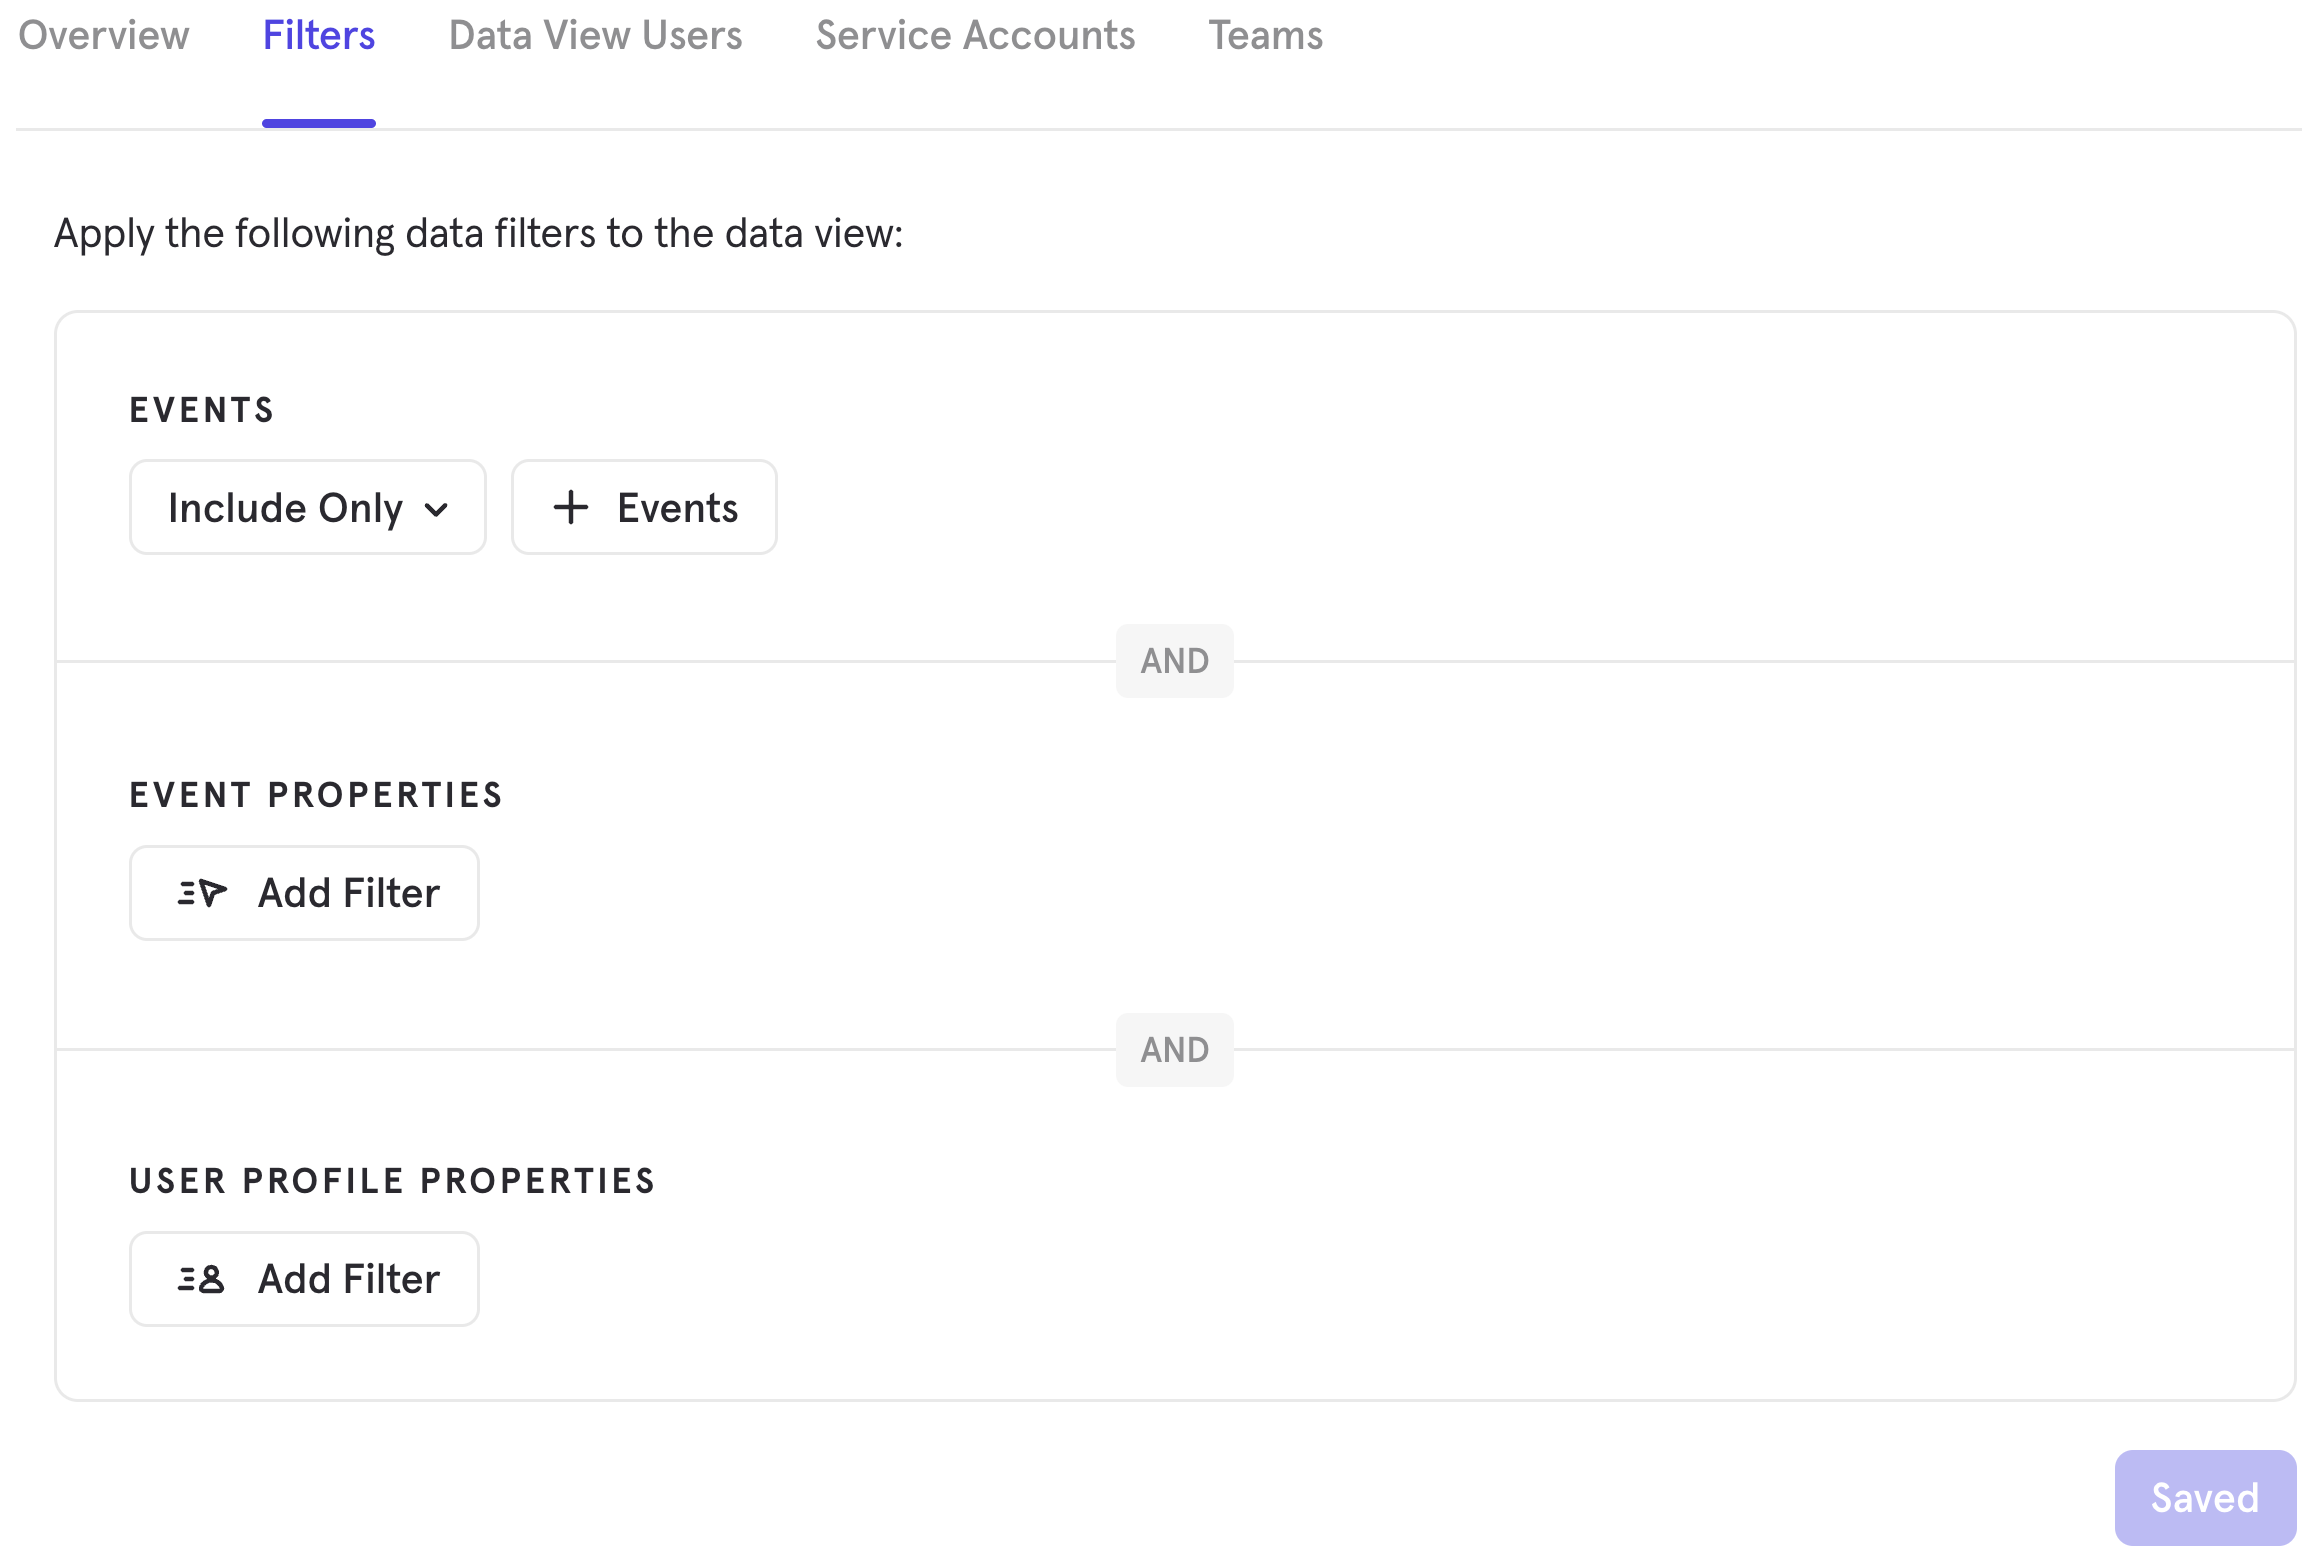
You can add data views within your project settings. A combination of filters can be applied depending upon the data access required:
- Events - include or exclude specific events names
- Event Properties - filter explicit property values across events (example: Mixpanel Library = web)
- User Profile Properties - filter explicit users based on their user property value (example: Staff User = true)
Note: Filtering by User Profile Properties removes the ability to analyze by Groups
Refer to docs for a more detailed guide on setting up Data Views.
Classified Data
In general, you should not be sending data that are considered sensitive (ie: Personal Identifiable Information, Secured Data, etc.) to your Mixpanel projects. Do consult your company's legal, security, or compliance teams before you send any potential sensitive data. Also refer to Mixpanel's Legal Hub (opens in a new tab) for our Privacy Program.
In scenarios where you want to send non-PII data but want to limit only certain users within the project access, you can do so using Classified Data](/docs/data-governance/data-views-and-classification#mark-properties-as-classified-data). This allows you to mark those specific event and user properties as classified, and only users who have been granted access to classified data can view them.
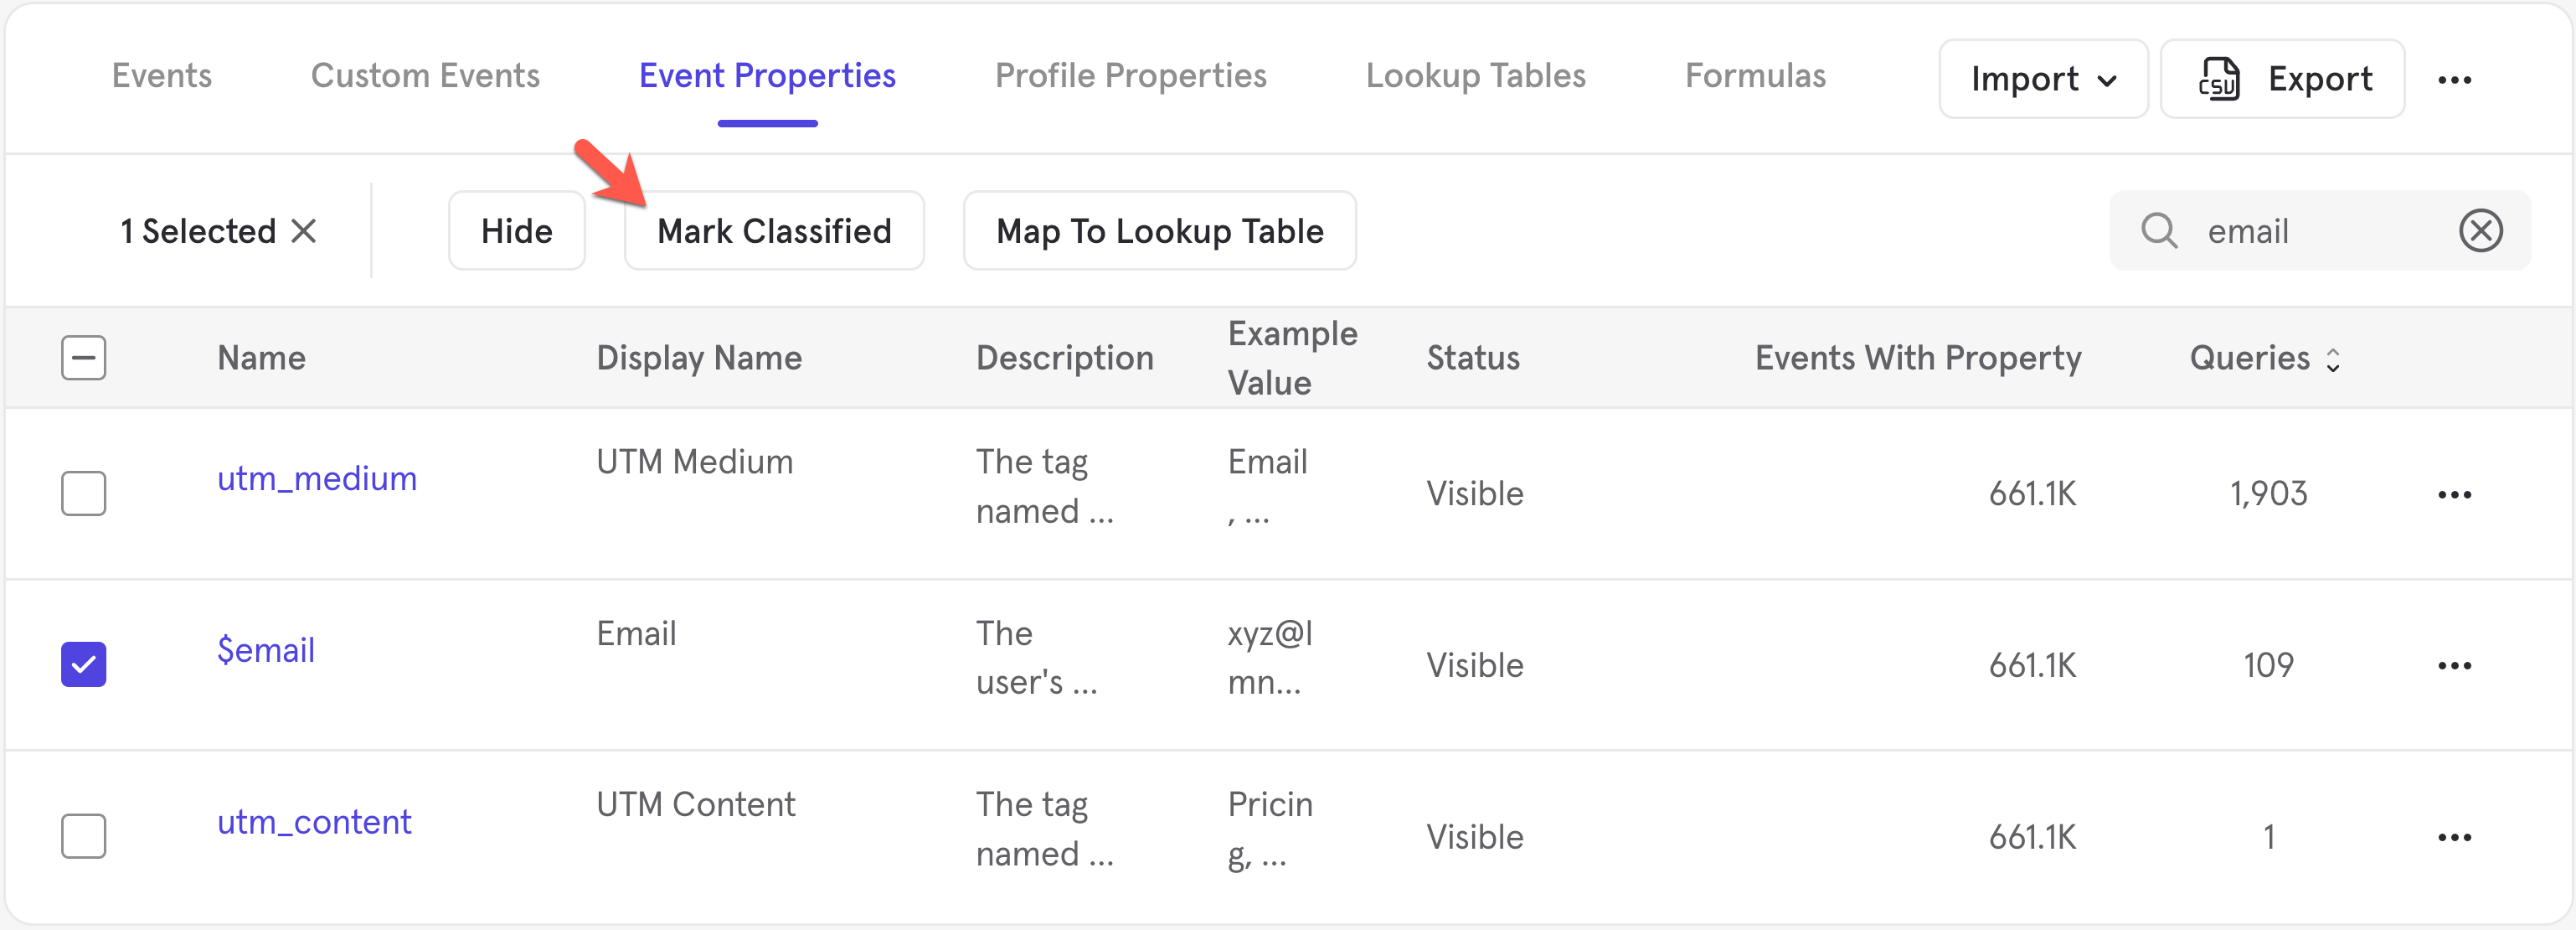
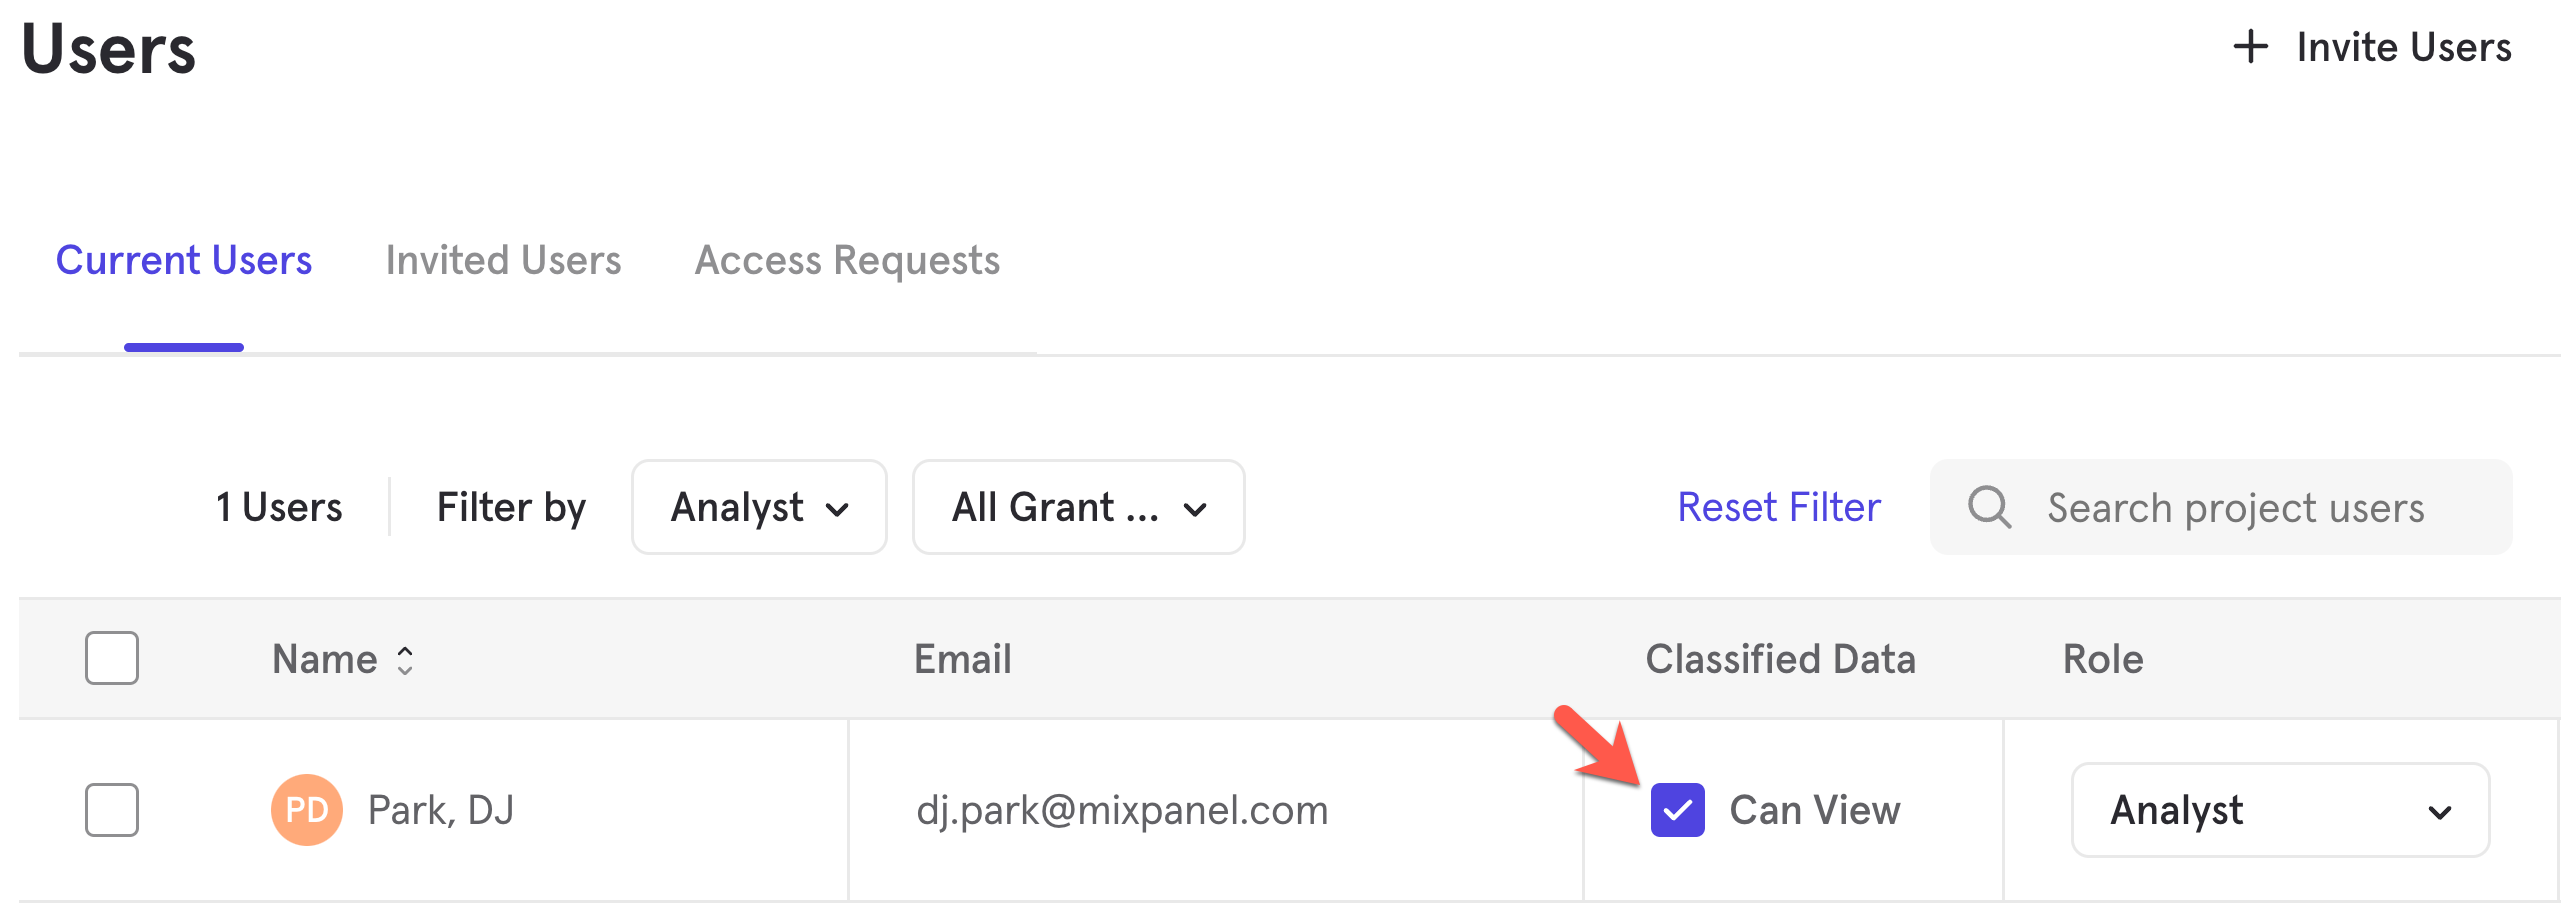
Once data is in your project, ensure that you have marked all relevant event and user properties as classified before you start granting access to users.
Refer to docs for a detailed guide on setting up Classified Data.
Setup Teams or Add Users to Mixpanel Projects
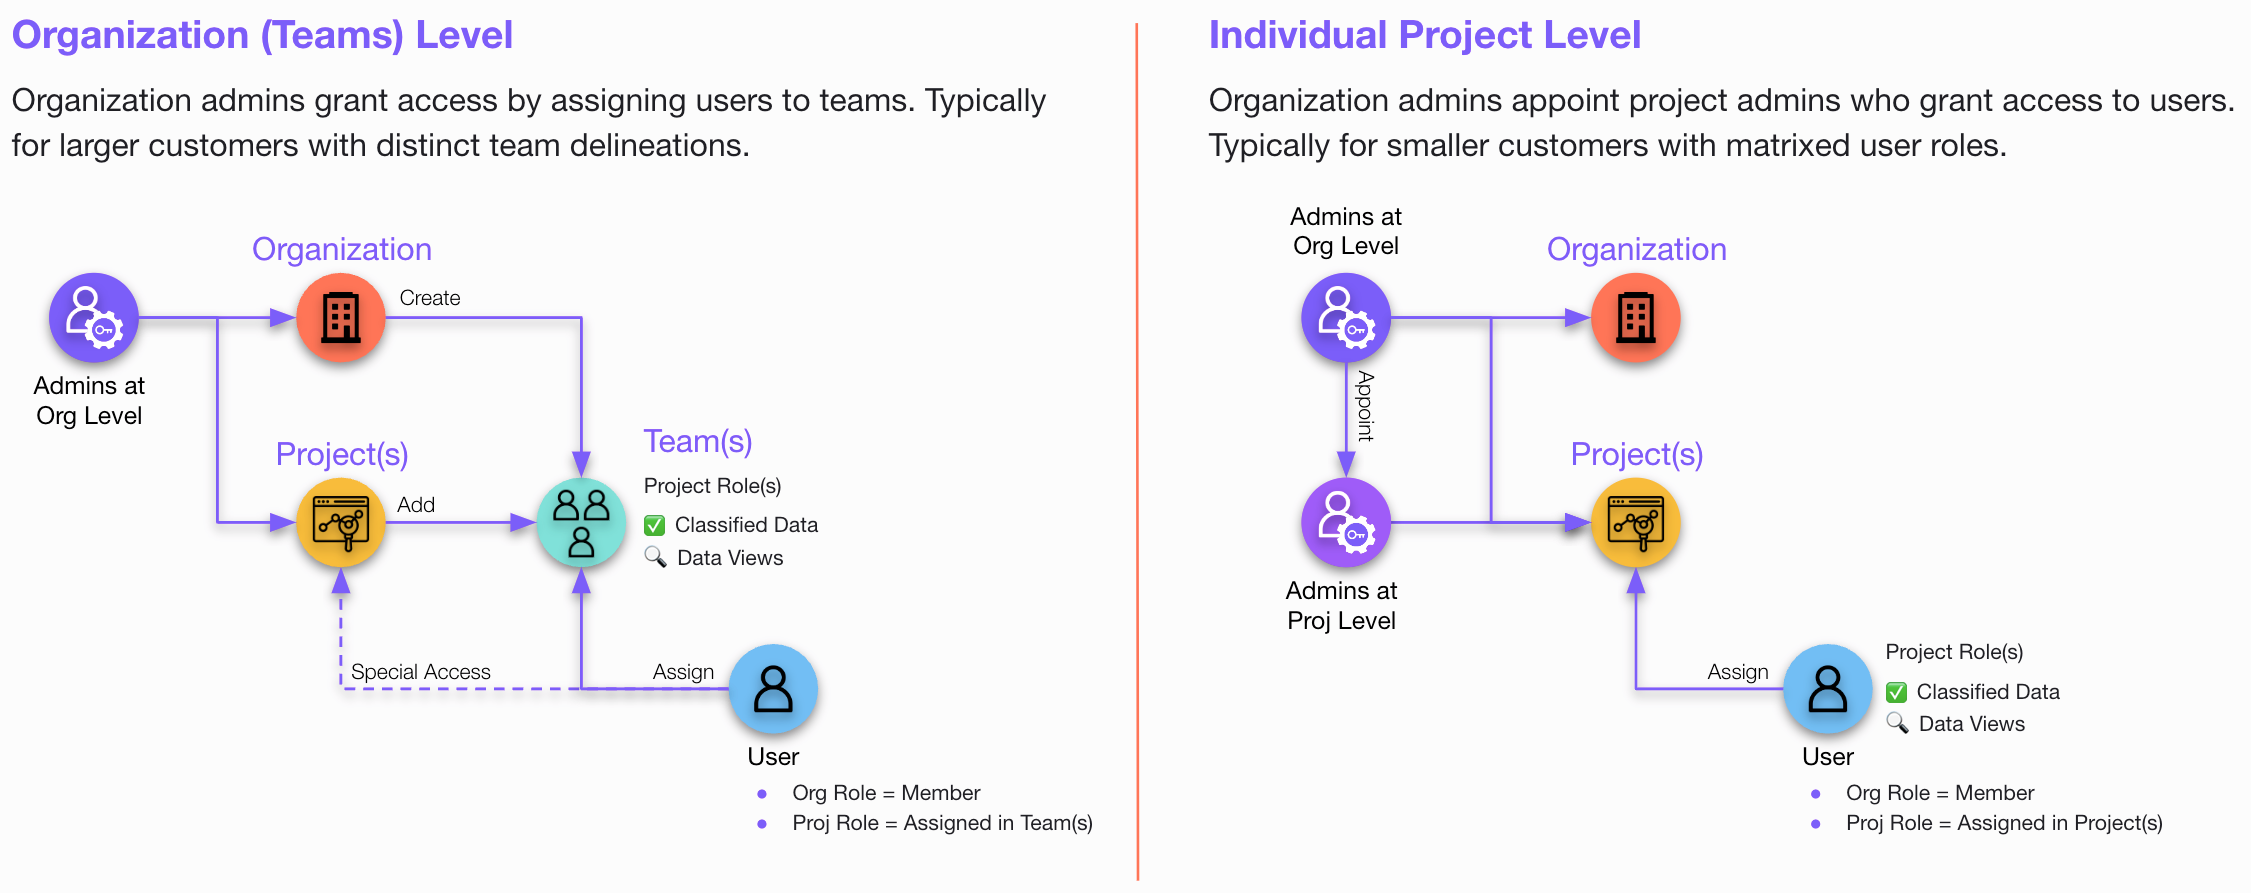
There are two general approaches to user management in Mixpanel.
- Teams - organization owners and admins create teams at the organization level, grant projects and permissions, and assign users to teams.
- Project based - organization admins appoint project level admins who grant permissions to users.
Users are required to be part of your Mixpanel Organization (either through self-joining or via an invitation from the admin), before they can be granted access to any Mixpanel Project.
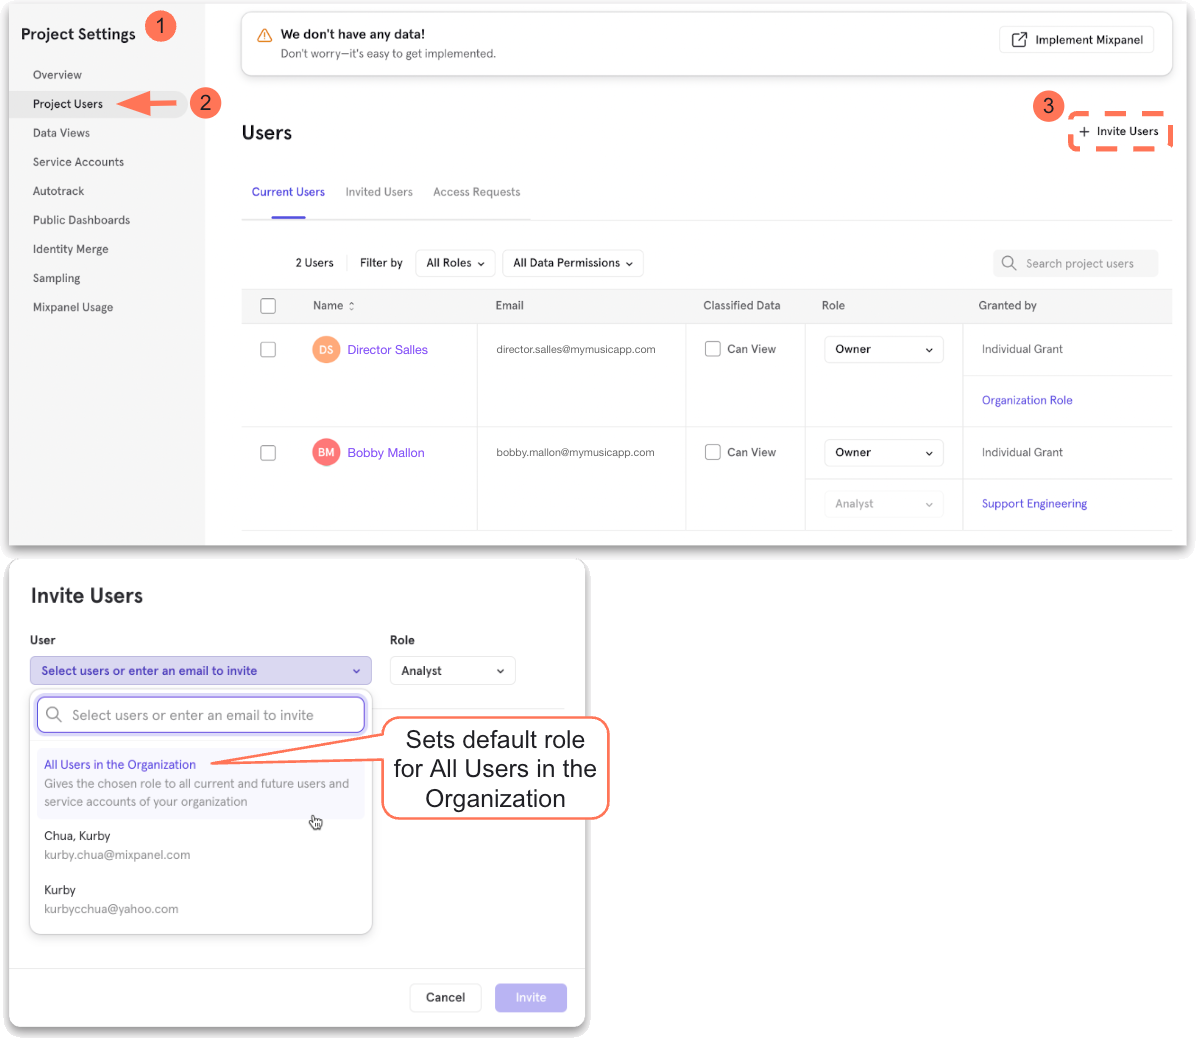
- Go to the Users & Teams under Organization Settings to setup your Teams, click here (opens in a new tab) (Optional)
- Invite users to your organization, either add them to teams or directly add them into your projects
- Assign the appropriate Organization and Project roles; a default project role can also be set for All Users in the Organization as a baseline access.
Refer to docs for a detailed guide on Project Setup.
Was this page useful?